Showing posts with label GO Cutter. Show all posts

Sunday, November 8, 2015

A mini bear paw finished quilt!

 I have another little finished quilt.
This little quilt top was put together in March 2011.
You can find the original post here.


I decided to use this little quilt top to practice some free motion quilting. 
It's not the best. I should have used different colours of thread.
But, it's really cute and I hung it up on my sewing room wall.
The blocks are just 6 inches.


I also started making blocks for the Farmer's Wife 1930's sampler quilt.


GnomeAngel.com

These are my first 4 blocks.
I'm going to try to work on these blocks over the next year.

I hope you had a good weekend.

Hugs


Monday, February 13, 2012

GO! Ahead and Show Some Love Blog Hop ***Giveaway CLOSED****

The Blog hop starts today, and Marjorie and I are the first ones up.
Don't forget to visit all the others blogs this week too!

Here is the line up!!!

February 13th
Ariane (Ariane's Crafts)
February 14th
Connie (Quilting by the River)
Linda (Living 4 Quilting)
February 15th
Lisa Marie (Scraps of Life)
Marilyn (North Hills Quilters)
February 16th
Alicia (Heirloom Quilting)
Marjorie (Marjorie's Busy Corner)
February 17th
Sharon (Crazee Corners)
Jacque (Lilypad Quilting)


February 18th
Stacey (Driving Miss Stacey)
Tracey (The Peony Teacup)
Paulette (Sweet P Quilting and Creations)

I've prepared this for a few weeks now.
I wanted to use Accuquilt GO! dies that a lot of you might already have.
You will need the circle die,
and the 5 inch square die.

I'm going to show you a very simple block that can be made with any of the circles on the circle die.
It's the half-circle pinwheel appliqued block.

This block can be used to make many different items.

Let's start!!!


Take your red and white/cream scraps out.

Instruction for the 5 inch unfinished block.

1) You will need to cut 2, 2.5 inch squares of the same red fabric.
You can also use the value die to cut the 2.5 inch red blocks.
 Iron fusible web on the back of the two red squares.
You can see in the image that I have 2 pairs of red squares.

2) Once you have ironed the fusible web to the red squares,
align your red squares over the smallest 2 inch circle on the circle die.
Cover the die with your cutting mat and crank the die through the machine.

3) You will have some nice perfectly cut circles.

4) Now take these circles to your cutting board and cut them in half.

Next Step......


1) Cut your 5 inch background squares using the 5 inch square die.
2) Bring a cut square to your ironing board.
You will iron you square in half with wrong sides together.

3) Then, fold in half again and iron without going over your first ironed crease.

4) When you open up your square, you should have the creases showing like in image #4.

Next.....

You will then take your half circles, remove the paper backing from them and lay them out on you block using the creases as guides.
Your blocks should look like the ones above.
Iron the half circles to your background fabric.
Then take these blocks to your sewing machine and zig-zag stitch all around the edges.
You can also use a button hole stitch or some other decorative stitch.

Now....what to make with these blocks.
A simple needle case would be so handy.


1) Sew your pinwheel block to another plain 5 inch background square.
Iron the seam open

2) You should now have a piece 9.5 X 5 inches.

3) For the inside of your needle case you need to cut a main piece 9.5 X 5 inches in background fabric,
Then a red piece of fabric for the pockets 9.5 X 6.5 inches.
You will iron the red fabric in half to form the pocket.

4) Lay the red pocket fabric over the background fabric and stitch a pocket line in the centre, then one 2 inches from the centre. Then baste stitch 1/8 th inch around the outer edge of the pocket.


5) Lay your inside piece over a piece of batting. 
The batting should be just a bit bigger then you inner piece.
Cut a 3 inch piece of ribbon and baste stitch it to the centre of the left side.

6) Lay the outer piece right sides together over the inside piece.
Pin in place.

7) Sew a 1/4 inch seam all around the edge of your fabric.
Leave about a 2 inch opening to allow for turning.
Make sure you back stitch at the beginning and ending stitches.

8)Trim your batting off and clip the corners.


9) Turn you needle case through the opening.

10) Iron your needle case and the opening to prepare for top stitching.

11) Top stitch using a scant 1/8 inch seam.

12) Cut an 4 X 8 inch piece of felt.
 Center the felt on the inside of the needle case.
Pin in place.
Flip over the needle case,
 and using the seam between the outer blocks stitch down the centre seam to secure the felt.

13) Add a matching button to the back.


You are now done!!!!!


I hope you like this tutorial.
If you have any questions, please let me know.

I'll have more ideas for this block in the next few days.
So please keep coming back.

Now, if you have made it this far down, you are in luck.
I'm giving away the above needle case to one lucky person.


Just leave a comment for a chance to win!!!


The giveaway winner will be announced on Friday!!


Winner is....


Jan said...
How cute is that, and you make it so simple! Thanks much!


Hugs


Tuesday, April 26, 2011

My version of the Carpenter Star quilt

Hi everyone!

I hope you all had a wonderful Easter weekend.
I worked all weekend.
We celebrated our Easter on Monday.

My youngest brother is getting married this summer, and I've been thinking of different patterns to make.
I had one idea, but didn't think i could make it happen in the time I had left.

So, I took my coloring pencils and graph paper out and started coloring.
She used the GO! 6.5 inch half square triangle die and the 6.5 inch square die to make it.
I have the 6.5 inch HST die, but this quilt pattern was for a lap quilt and I wanted a queen.

Here is the drawing I came up with.

I just kept adding hst's around my center Carpenter Star.
I really like the look of it.

This is the fabric I had purchased for the quilt.
It's a Henry Glass collection, and a few kona solids.

I cut all my fabric.
I needed 100 red , 100 black, 148 white triangles.
I cut them using my GO! cutter and the 6.5 inch HST die.
Here they are all cut up.
It went really fast to cut them up.

I did start piecing the center.
Here is what I have done up to now.
I wish my design wall was bigger.
 
As I get further along, I will share my progress with you.

Hugs

Ariane

Wednesday, December 1, 2010

Wow! We are in December already!!

The time is just flying by!
Don't you think?

I have been so busy.
On the weekend, my parents came for a visit.
My second oldest was having his confirmation.
It was a beautiful celebration and I'm so glad my parents came to celebrate with us.

We also celebrated our Christmas together, since I won't be able to go home this Christmas. My husband and I have to work through the holidays. Our time off doesn't coinside.
I gave my parents my red dresden quilt.

I made it to put on their table.

I also gave them the matching potholders.
They both loved their gift.

We had a wonderful dinner with them and my sister Michele and her little family too.
My parents took us out to Swish Chalet.
My kids love eating there.
It really was a great dinner.
We all had a great time.

And I didn't have to cook.
Yeah!!!
I had bought all this food to prepare for a nice dinner.
But they wouldn't have it.
My parents didn't want me to spend all my time in the kitchen getting dinner ready.
They wanted all of us to relax and enjoy our little time together.
That was a great gift.
Thanks Mom and Dad!!!

After the weekend, I had to work.
So, Monday and Tuesday I didn't do any sewing.
I was just too tired after my shift.
Today, I have to catch up on the laundry.
My husband helped me tidy up the house already.
So, if I can get all the laundry done today, then tomorrow I can relax.
Yeah!!!

My Mom just loved the mug rugs I made for teacher gifts.
She put in an order from me..
So, I'm going to try to make those and send them to her before the holidays.
I taught her how to do some free motion quitling too, while she was here.
She had so much fun trying it out.


Well, I have so much stuff to do to get ready for the holidays.
I haven't even started baking, decorating......hopefully the tree can go up tonight.
The kids always love to do this together.
We will see how things go.

Only 24 more days until Christmas!!!!

I hope you all have a great day!

Hugs

Ariane


Sunday, November 14, 2010

Christmas Quilt Show @ Sew Cal Gal

Hi everyone,


SewGalCal's is hosting a wonderful Christmas Quilt Show on her blog.

So, I decided to participate.
I don't have a big Christmas quilt.
But I do have a little project.

I'm entering my "Santa is Coming" table runner in the quilt show.

This is one of the free tutorials I made using my GO! Cutter Isosceles Die.
I just love this little table runner.
I really have fun coming up with this pattern.

Here are a few close-up's.
I hope you like the table runner.
The tutorial to make this can be found here.

Thanks SewGalCal for hosting this quilt show.

Don't forget to go check out all the other quilts in the show here.

There are many prizes to be won.
So, go enter your Christmas quilt.

Hugs

Ariane

Tuesday, November 9, 2010

My 1st mug rug, and things to swap???

Hi everyone!

Today I decided to tackle my first mug rug.
The one I made is a little bit big.
It's 7.5 x 14 inches.
But I still like it.
This is only my first attempt.
I will keep trying and hopefully I will come up with just the perfect one.

This one is made out of pieces that I had left from cutting some dresden plates for my Bee blocks.
I thought it would be the perfect way to use them up.


I also worked on making some of my Bee blocks.

This first one I made for Austen.
I hope she likes it.

This second one I made for Brenda.
Unfortunately, I ran out of dark grey.

She didn't send quite enough.
But I enjoyed working on it.
I still sent it to her and she will be able to use her leftovers to finish it.
I do want to make this block again.


I am also hoping to find someone who would be willing to swap some fabric with me.

I have this Heather Bailey Pop Garden fabric shown below.
I would be willing to swap either fat quarters of each of the four prints, or even half yard cuts, for an equal amount of fabric.

I also have two Amy Butler patterns that I would like to trade for fabric.

I also have these four other patterns that I'm willing to trade for fabric.


I love all kinds of fabrics.
 Collections I'm trying to add to my stash are:

1) any modern fabrics. (not orange)
 2)some Minick and Simpson fabrics from any of their collections.
3) any Bonnie and Camille fabric
4) I don't really use batics, so I'm not interested in these.
5) I also love country fabrics.
6) I would also take scraps of fabric. LOVE scraps!!!
7) Red is my favorite color. But I like blues, greens, brown, aqua, pink. But not orange.

So, If any of these interest you, send me an email with pictures of what you would like to trade.
Hopefully someone will want these.

Hugs

Ariane

Sunday, October 31, 2010

November is my month for the Maple Leaf Bee!

Hi everyone,

I joined the Maple Leaf Bee in August, when one of the other members had to drop out.
 I volunteered to take her place.

So, my month came fast and I had to decide what to ask the girls to make.
I wanted it to be a stash busting project, and a modern project.

So, I took out a bunch of my modern fabric and started cutting.

I decided to use my GO! Dresden Die since I love it so much.
I cut out all the petals for the girls.
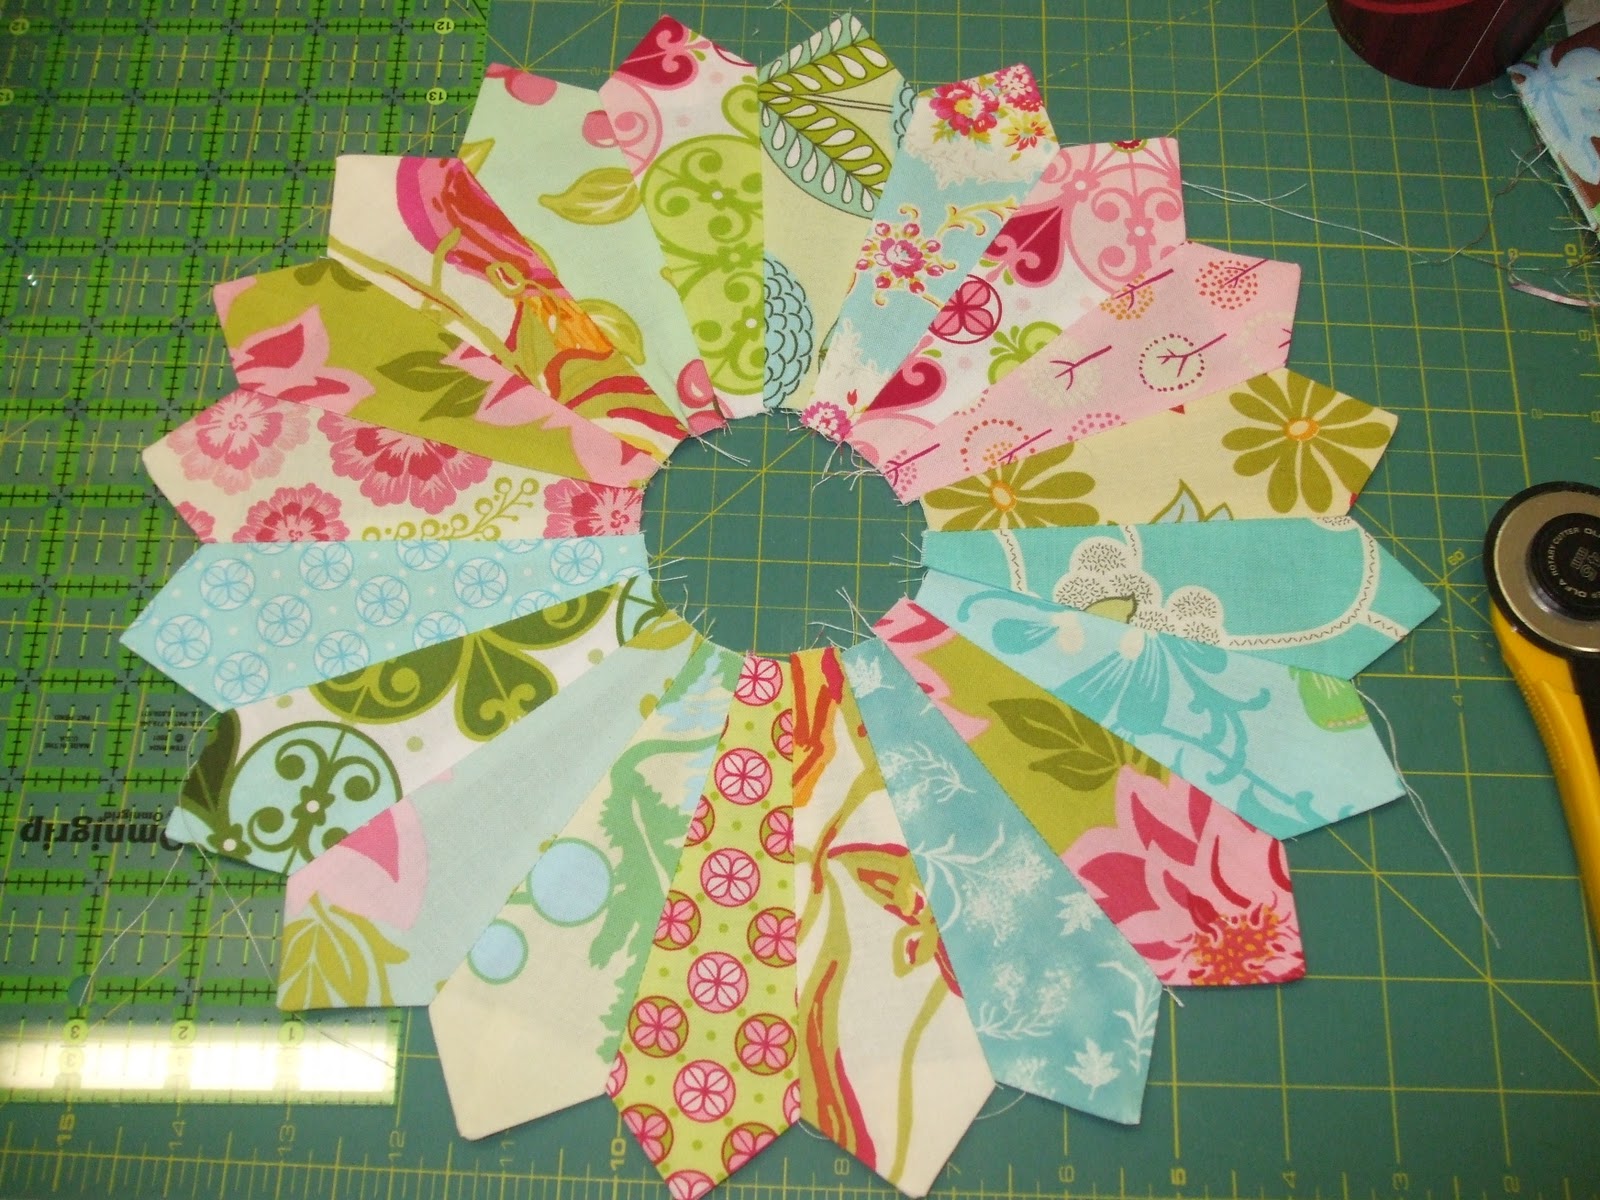
I used 20 different fabrics, in aqua's, pinks,  and greens.
This is the test block that I made.

I thought I would do a little tutorial for the girls, in case they had never made a dresden block before.

Here it is.
First you want to fold the petal right side together at the wide end and stitch it across.
As you can see above, just chain stitch all the petals. It goes pretty quick this way.
Once you have all the tops stitched, then cut them apart and trim the point to about an eighth of an inch from the seam you just made. This just helps in turning the tip of the petal.
Turn all the petal tips right side out. You may have to use a tool to get the tip out all the way. I used the tip of my scissor just to push it out a bit. Then, iron the tips of the petals. I have the petals all layed out the way I want to sew them. See below:
Now, I will start to sew the petals together in pairs. You can chain stitch them to make it quicker.
I use my 1/4 inch foot to sew the petals together. I started sewing from the edge of the petals. I find that this makes for a nicer finish. You just match up the top corners of both petals and start stitching. Once all your pairs are sewn together, you want to iron the seam open.
Once all your pair seams are ironed, keep sewing the pairs together, and ironing your seams open, until you have your dresden sewn together as below.
This is what the back should look like.
Now, you can see that mine isn't perfect. Just do your best when sewing them together.
It's time to get the circle ready for the middle. I cut a five inch circle of fabric using the GO! Circle die and included a 4 inch cardstock circle cut using the GO! Dresden die circle, to help you turn the edges for the circle.
I like to stitch this with the sewing machine. So, set your stitch length to the longest setting and with your 1/4 inch foot, start stitching all around the circle as shown below.
You are going to leave the starting and ending threads long enough so that you can sinch the fabric around the cardstock circle.
See how I sinched the fabric around the cardstock. Now you want to iron it well on both sides. I used a bit of spray starch on it before I removed the cardstock circle.
See how nice the edges are turned, and it's a perfect circle.
You now want to sew this circle onto your dresden using a blanket stitch or zigzag.
Once you have it sewn on you can pin your dresden to your background fabric and stitch it on using a blanket stitch or a zigzag stitch.
And you are done.
Isn't is nice?

Well, I hope this little tutorial is helpful.

Wishing all of you a Happy Hallowe'en.

Hugs

Ariane