Showing posts with label GO Circle die. Show all posts

Tuesday, February 14, 2012

Day 2 - GO! Ahead and Show Some Love Blog Hop


Here is the line up!!!

February 13th
Ariane (Ariane Quilts)

    February 14th


      February 15th
      Lisa Marie (Scraps of Life)
      Marilyn (North Hills Quilters)


      February 16th
      Marjorie (Marjorie's Busy Corner)


      February 17th
      Sharon (Crazee Corners)
      Jacque (Lilypad Quilting)


      February 18th

      GO! and visit Connie and Linda for some wonderful tutorials.

      I have more inspiration using the block I shared yesterday.

      This time, I used a 7.5 inch background square,
      and the 3 inch circle on the circle die to make the block. 
      Iron fusible web to the back of 3.5 inch squares.
      Lay them on your circle die, using the middle 3 inch circle as shown in the photo below.

      Once your circles are cut with the GO! Cutter,
      take them to your cutting mat and cut them in half as shown below.


      Make your blocks the same way as I showed yesterday.
      Make3 blocks for a small table runner.
      Sew them together.
      Add a border. (I used 2.5 inches wide strips)
      And Voila.....


      Cute eh!!!
      Can you imagine this block used to make a scrappy quilt, or a baby quilt?
      Change the colours, use all solids to make it more modern.
      The possibilities are endless.

      Don't forget my little giveaway from yesterdays post.

      Hugs

      Monday, February 13, 2012

      GO! Ahead and Show Some Love Blog Hop ***Giveaway CLOSED****

      The Blog hop starts today, and Marjorie and I are the first ones up.
      Don't forget to visit all the others blogs this week too!

      Here is the line up!!!

      February 13th
      Ariane (Ariane's Crafts)
      February 14th
      Connie (Quilting by the River)
      Linda (Living 4 Quilting)
      February 15th
      Lisa Marie (Scraps of Life)
      Marilyn (North Hills Quilters)
      February 16th
      Alicia (Heirloom Quilting)
      Marjorie (Marjorie's Busy Corner)
      February 17th
      Sharon (Crazee Corners)
      Jacque (Lilypad Quilting)


      February 18th
      Stacey (Driving Miss Stacey)
      Tracey (The Peony Teacup)
      Paulette (Sweet P Quilting and Creations)

      I've prepared this for a few weeks now.
      I wanted to use Accuquilt GO! dies that a lot of you might already have.
      You will need the circle die,
      and the 5 inch square die.

      I'm going to show you a very simple block that can be made with any of the circles on the circle die.
      It's the half-circle pinwheel appliqued block.

      This block can be used to make many different items.

      Let's start!!!


      Take your red and white/cream scraps out.

      Instruction for the 5 inch unfinished block.

      1) You will need to cut 2, 2.5 inch squares of the same red fabric.
      You can also use the value die to cut the 2.5 inch red blocks.
       Iron fusible web on the back of the two red squares.
      You can see in the image that I have 2 pairs of red squares.

      2) Once you have ironed the fusible web to the red squares,
      align your red squares over the smallest 2 inch circle on the circle die.
      Cover the die with your cutting mat and crank the die through the machine.

      3) You will have some nice perfectly cut circles.

      4) Now take these circles to your cutting board and cut them in half.

      Next Step......


      1) Cut your 5 inch background squares using the 5 inch square die.
      2) Bring a cut square to your ironing board.
      You will iron you square in half with wrong sides together.

      3) Then, fold in half again and iron without going over your first ironed crease.

      4) When you open up your square, you should have the creases showing like in image #4.

      Next.....

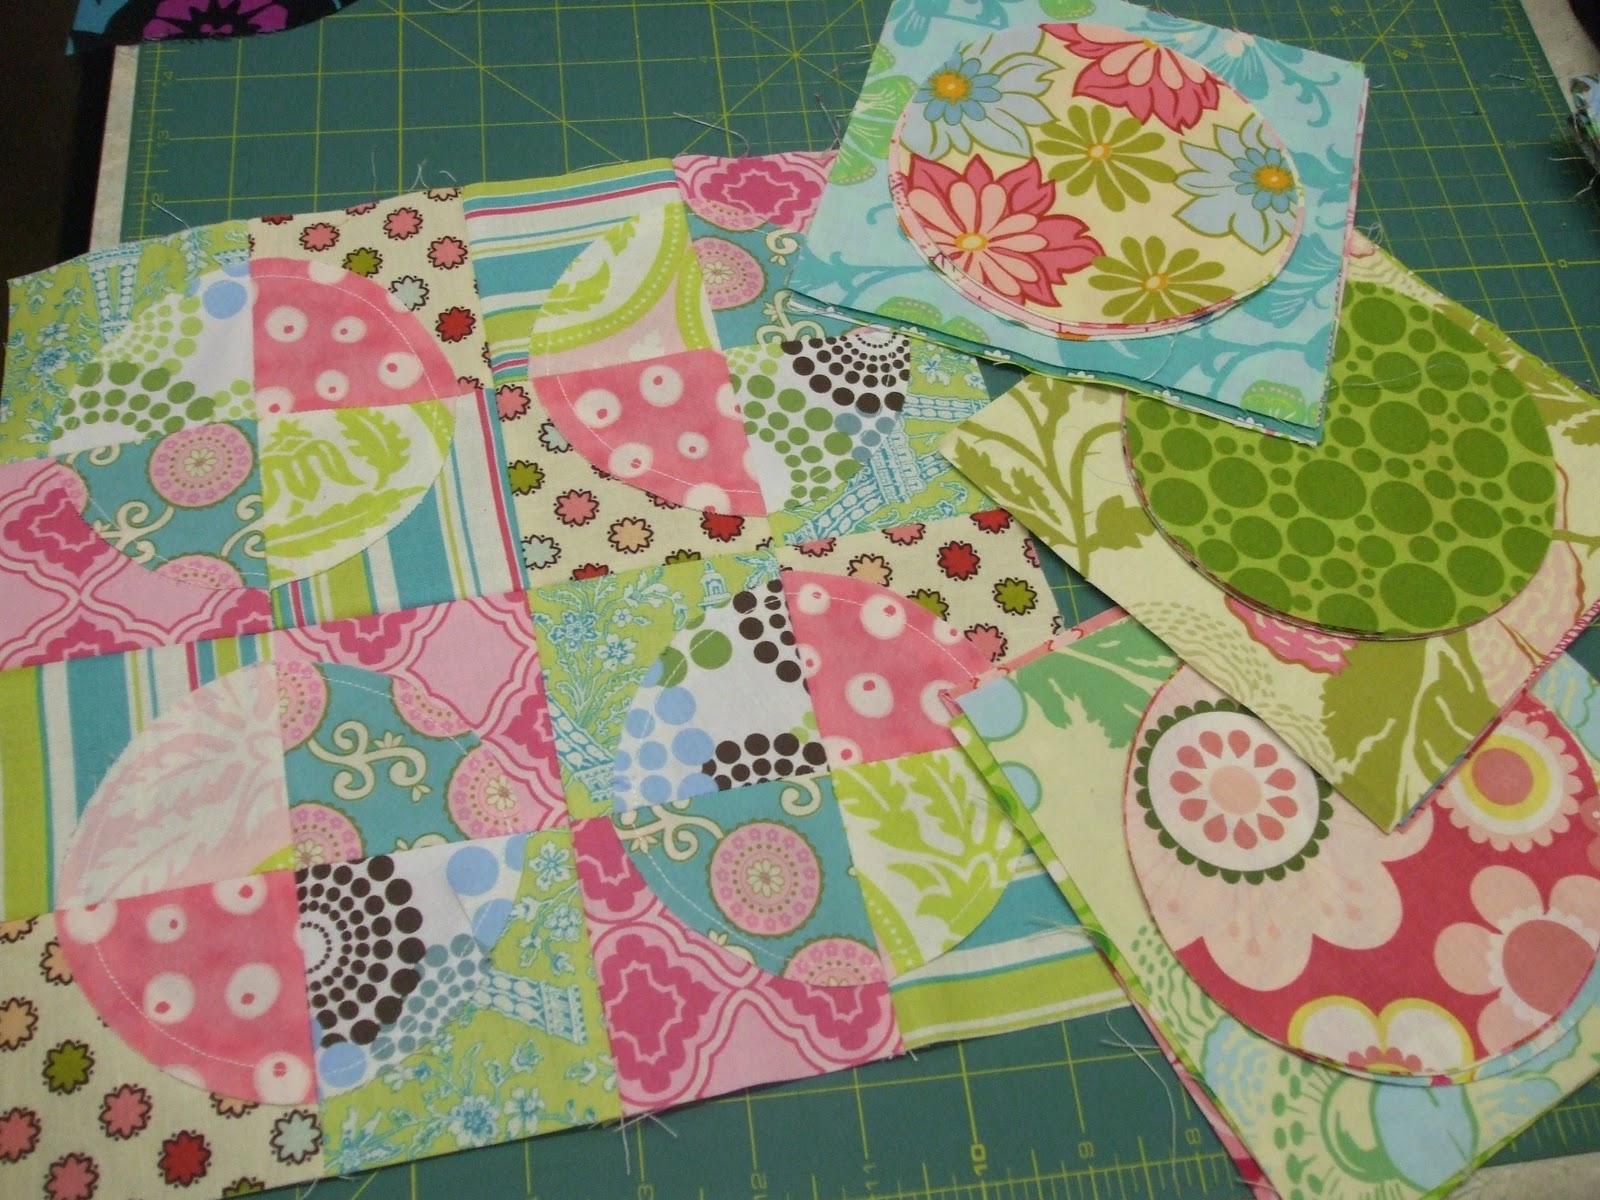
      You will then take your half circles, remove the paper backing from them and lay them out on you block using the creases as guides.
      Your blocks should look like the ones above.
      Iron the half circles to your background fabric.
      Then take these blocks to your sewing machine and zig-zag stitch all around the edges.
      You can also use a button hole stitch or some other decorative stitch.

      Now....what to make with these blocks.
      A simple needle case would be so handy.


      1) Sew your pinwheel block to another plain 5 inch background square.
      Iron the seam open

      2) You should now have a piece 9.5 X 5 inches.

      3) For the inside of your needle case you need to cut a main piece 9.5 X 5 inches in background fabric,
      Then a red piece of fabric for the pockets 9.5 X 6.5 inches.
      You will iron the red fabric in half to form the pocket.

      4) Lay the red pocket fabric over the background fabric and stitch a pocket line in the centre, then one 2 inches from the centre. Then baste stitch 1/8 th inch around the outer edge of the pocket.


      5) Lay your inside piece over a piece of batting. 
      The batting should be just a bit bigger then you inner piece.
      Cut a 3 inch piece of ribbon and baste stitch it to the centre of the left side.

      6) Lay the outer piece right sides together over the inside piece.
      Pin in place.

      7) Sew a 1/4 inch seam all around the edge of your fabric.
      Leave about a 2 inch opening to allow for turning.
      Make sure you back stitch at the beginning and ending stitches.

      8)Trim your batting off and clip the corners.


      9) Turn you needle case through the opening.

      10) Iron your needle case and the opening to prepare for top stitching.

      11) Top stitch using a scant 1/8 inch seam.

      12) Cut an 4 X 8 inch piece of felt.
       Center the felt on the inside of the needle case.
      Pin in place.
      Flip over the needle case,
       and using the seam between the outer blocks stitch down the centre seam to secure the felt.

      13) Add a matching button to the back.


      You are now done!!!!!


      I hope you like this tutorial.
      If you have any questions, please let me know.

      I'll have more ideas for this block in the next few days.
      So please keep coming back.

      Now, if you have made it this far down, you are in luck.
      I'm giving away the above needle case to one lucky person.


      Just leave a comment for a chance to win!!!


      The giveaway winner will be announced on Friday!!


      Winner is....


      Jan said...
      How cute is that, and you make it so simple! Thanks much!


      Hugs


      Wednesday, December 8, 2010

      Christmas Stockings for the kids!!

      Hi everyone!

      I hope you are all well.

      I know I haven't been blogging as much this month.
      I've just been working a lot.

      But, today I took the chance to do some sewing.
      I've been wanting to make Christmas Stockings for the kids for a while now.
      So, today I just decided to get my butt in gear and do it.

      I used a stocking template from an old Thimbleberries book that I bought second hand.
      Then, I took out my stash of Christmas fabric and started putting them together.
      I printed the kids names in a large font.
      Then, fused their names to the stockings.

      I used my GO! cutter to cut out some wintery shapes to decorate my stockings.
      I sewed leftover bits of batting together, to make them big enough to use for the stockings.
      I didn't want to have to cut into a big piece of batting.
      It was a good way to use up my batting scraps.
      And you can't tell at all.
      
      I really love how they turned out.
       For each stocking I used one fat quarter for the outside,
       one fat quarter for the lining and scraps to make the binding and the appliques.
      I love the main fabrics that I used.
      It's just gorgeous!!!

      Now, I just have to make one for my husband and one for me.
      Then my stockings are all done.

      I think I did really well today.

      But I still have a lot to do for Christmas.
      But it's a start.

      Hugs

      Ariane

      Friday, November 26, 2010

      I'm a guest blogger at Stash Manicure today!!!

      Hi everyone,

      I'm guest blogging at Stash Manicure today.
      Go check it out.

      I share some of my first quilts and some of my newer ones.

      Like this one!!


      So, go on over to Stash Manicure and comment on my post.
      Send me a little love over there! LOL!!!

      I hope you all have a wonderful day.

      Hugs

      Ariane

      Thursday, October 21, 2010

      After washing pictures of Fun with bubbles and I'm sick....again!!!!

      Well, here are a few pictures of my "Fun with bubbles" quilt, after being washed.
      It is even softer now then before.
      I used flannel on the back of this quilt, too.
      I forgot to mention that yesterday.
      So, with the soft frayed edges on the front, the quilting and the flannel, there are so many different textures to feel. I can just imagine a little girl rubbing her hands on this quilt and just loving the sensations.
      I really love this little quilt.


      On another note, I have the flu.
      That's why I didn't post these pictures yesterday.
      You know the symptoms, bad congestion, aches and pains, headache, fever, coughing.....
      I had a really bad fever and ended up in bed from about 2 pm yesterday to about noon today.
      I'm still pretty sick, but not as bad as yesterday.
      Don't you just hate being sick.

      It's a good thing my kids are older now.
      They dodged people at the door that wanted to speak to me, never passed the phone to me unless it was really important and fed themselves dinner. They all got there homework done, and went to bed at their regular time for a school night. My husband was at working, so they were pretty much on their own.
      They are such good kids. Love them so much.

      My husband got up this morning and made sure the kids had everything they needed for school. Everything was taken care of. I was able to rest. Which I really needed, because I coughed so much during the night and was so congested. It was a really long night.

      But I'm truly blessed to have such a great little family who takes care of me.
      I probably won't be doing to much sewing, until I feel better. But I think I've done quite a bit this month already. So, I'm good.

      Hugs

      Ariane
      

      Wednesday, October 20, 2010

      Fun with bubbles!!! quilt completed

      So, I decided to name my little raw-edge circle quilt.
      "FUN WITH BUBBLES"

      Isn't that a cute name?

      Anyways, I finished it today.
      I took a few pictures before I washed it.
      I wanted to see how it would look before and after washing.

      So, here are the before washing photo's.

      I hope you like it. When it's done washing and drying. I'll show you those pictures.

      Hugs

      Ariane

      Monday, October 18, 2010

      My mini raw edge circle quilt top done!!!

      Okay!!

      This will be a short post, because I have to get to bed.

      So, I finished this little quilt top tonight.
      I hope to quilt it tomorrow night,
      and hand it in on Wednesday.

      Do you think I can make it?
      We will see.

      I hope they like this.
      There are not a lot of quilters that use modern fabrics in my guild.
       I think that some would if it was more available in our area.

      I think this would make a cute little quilt for a little girl to play with.
      She could use it for her dolls, or just as a security blanket.

      On another note, I was featured on Stash Manicure today.


      http://stashmanicure.blogspot.com/

      Yeah!!!!
      I was a plan B guest blogger.
      I had volunteered to write a post,
      in case something happened and one of the other guest bloggers couldn't post.
      And today was the day.
      So go check it out.

      Well, that's all for today.

      Hugs

      Ariane


      A mini raw edge circle quilt in the making!!!

      Okay! I know I don't need more projects.
      But, I received an email today from my local quilt guild wanting some mini quilts.

      You see,

       the Kingston Limestone Quilters' Guild
      is having

      A LITTLE QUILTS AUCTION
      on Wed. November 3, 2010
      Time: 7:00 - 9:30 pm
      Location: The Seniors Centre
      56 Francis Street
      Kingston, Ontario

      This auction is to support our community quilts projects, all the organizations that we help
      and to help pay for renting a space every month.

      I have already donated one little quilt.
      But since they still need more, I thought....ahhh...
      what the heck.....I'll make another one.

      So, I decided to make a mini version of

      I made the circles and squares smaller.
      I wanted to use my GO! Cutter and circle die to cut the circles.
      So, I cut some 5 1/2 inch squares and used the 5 inch circle on the circle die to cut the circles out.
      For the background square, I cut them 6 1/4 inch.
      I made one block. I decided not to scatter all the colors but actually make blocks.
      My little quilt will be made up of these 4 blocks.
      Here is my first block.

      I just love it!!!

      So, now I have cut out all the pieces for the next 3 blocks. I plan to put them together this evening after I get off work. Hopefully, I won't be too tired.

      Here is a pic of my block with the cut up pieces.


      If you live in the area, you should come to the auction
       and see what is up for auction.
      It's a silent auction,
      and there will also be other items for sale,
       and some draws too!!!

      Anyways, Gotta go!!

      Hugs

      Ariane


      Sunday, October 17, 2010

      My red dresden quilt top is DONE!!!!

      I just want to say thanks to everyone who has been leaving comments about the progress of this quilt top.
      I'm just so thankful for all the support you guys all give me in my quilting journey.
      It really makes my day!!!

      So, I've been working on the borders this afternoon.
      I put of solid cream border that finished at 1 inches wide.
      Then, I decided to pull out all my little strips of red and cream fabrics. I cut them 2 1/2 inch long. I used all different width of strips from 1 1/2 inches, to 2 1/2 inches wide.
      Then, I chain pieced a cream piece to a red piece until all my pairs were sewn together. Then, I divided all my pairs into four piles. Then started sewing all my pieces together to make four strips.
      When my strips were long enough, I sewed them on to my quilt.
      So, these borders were pretty randomly pieced.
      But, I really like the way they turned out.
      And I busted more of my stash of reds and creams.
      Yeah!!!!

      So, now I have to figure out what I'm going to use for a backing.
      I hope you like the way it's looking!!

      Hugs

      Ariane

      My little red dresden quilt!

      Hi everyone!

      I hope you are all having a nice weekend.

      I worked on my little red dresden quilt last night.
      I finished the hst border that I had started.
      Then I decided I wanted to put the block on point.
      I didn't have enough of one fabric to make the triangles.
      I'm a scrappy quilter. I usually only purchase fat quarters.
      I don't buy a lot of yardage, unless it's on sale or I need a backing.
      So, I'm thinking....ughhhh.....I'm going to have to buy more fabric.

      Then, I had a lightbulb moment.

      I'll make myself a bigger piece of fabric.
      This is a stash busting project after all.
      So, I cut some squares of light fabric from my leftovers from the Jack-in-the-pulpit quilt.
      I made 2, 4 patch blocks and cut them on the diagonal to make four triangles.
      Then, I stiched them to my block.

      Then, I decided I wanted to use my GO! Circle die.
       So, I backed scraps of red fabric with fusible web,
      and cut the circles out using my circle die. Easy peasy!!!!

      I decided how I wanted them to be placed on my corner pieces,
      ironed them on, and
      VOILA!!!
      This is where I'm at.
      I'm thinking, I'm going to put a thin solid cream border around this.
      Then, I'm going to use my scraps to make a sort of, piano key border.
      I only have so many scraps left. I may have to be a bit creative with the outer border.
      We will see what I come up with.

      I was asked, about the GO! Dresden die and how many petals I used.
      I have 20 petals on my dresden. This is my first time ever making a dresden block.
      So, you may ask, how did I get it to work out.
      Some people have been having a hard time using only 20 petals, and have used 21 up to 23 petals.
      I think it's due to seam allowance. I used my 1/4 inch foot to make sure that my seams were all even.

      So, What do you think of my stash busting little red dresden quilt top.
      I think this may end up as a Christmas present.
      I hope you like it.

      Hugs

      Ariane